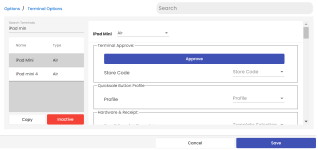
To approve an iPad as a terminal in the Online Options
In the 3.100 version, you can approve you iPad as a terminal online now instead of in the terminal-based CPS software. This means you don’t need to be logged onto a computer, and you only need access to the Internet and a browser to go to Online Options.
Note: In the 3.102 release, you will be prompted with an Approve button on the iPad if it has yet to be added as a terminal. Click that Approve button. You must log into to the same database's Online Options then navigate to Terminal Options screen, then complete the steps below. After you click Save
To see a video of this process, click here>>
-
Go to the Online Options site and log in as an admin or with the proper permissions.
-
From the Main Hamburger menu, select Options then Terminal Options. The Terminal Options page displays.
-
Enter the name of the iPad if you know it in the Search Terminal field. Matches display in the box below.
Note: If you don’t know the name, on the iPad with CPS Air open under the Hamburger menu, go to Options and look under About. To the right of the field Terminal, you'll find the name of your iPad.
-
Select the iPad that you are going to approve. The Terminal Approve section displays to the right.
-
Select the Approve button. It now reads Approved on the button.
-
Make any other necessary changes on this page.
-
Select Save. Update Successfully displays at the bottom of the page and the approve/authenticate screen disappears on the iPad replaced by the PIN login screen.
